Every other USB writer — Rufus, balenaEtcher, dd — flashes one ISO and destroys whatever was on the drive. Ventoy flips that: you install it to the stick once, then boot ISOs by copying them onto the drive like any other file. Ventoy shows a menu at boot and lets you pick.
What you need
| Thing | Details |
|---|---|
| USB drive | 16 GB minimum, 64–128 GB if you want a real collection. USB 3.0 makes installs much faster |
| Free space | Enough for the ISOs you want on it — a Windows ISO alone is ~6 GB |
| A PC | Windows or Linux to run the installer. Ventoy has no macOS installer |
| Backups | Installing Ventoy erases the entire drive. Nothing on it survives |
Ventoy's Install button repartitions the whole device. Copy anything you care about off the stick first, and read the device letter/path twice before you click — picking the wrong disk is the one mistake here that actually hurts.
Step 1 — Download Ventoy
Grab the release from ventoy.net — the download page redirects to SourceForge or GitHub Releases, both official.
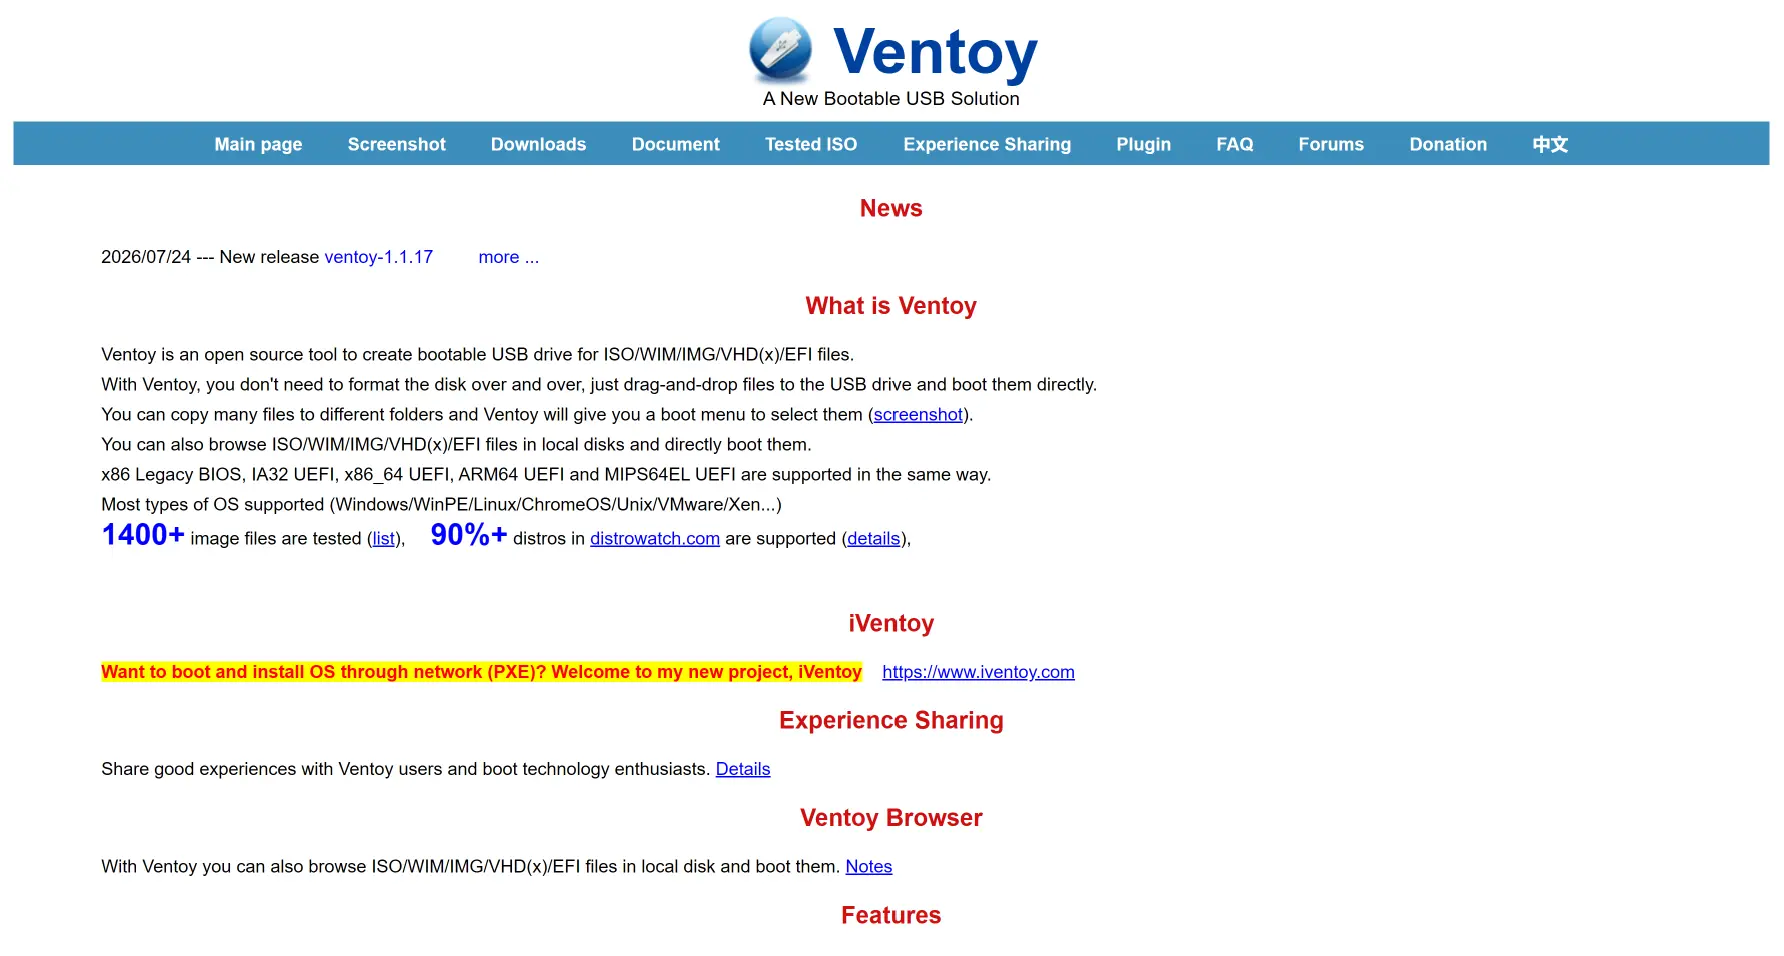
Download ventoy-x.x.xx-windows.zip and extract it anywhere — Downloads is fine. There's no installer and nothing gets added to your system; it's a portable folder you can delete afterwards.
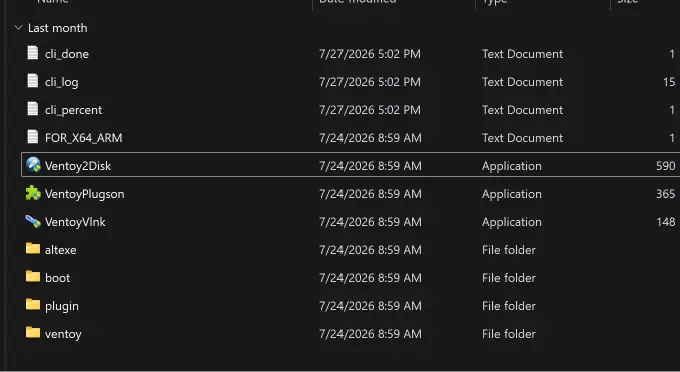
Ventoy2Disk.exe is the installer. The other two are optional extras: VentoyPlugson is a GUI for the plugin config file, VentoyVlnk creates shortcut-style links to ISOs stored on your internal disks. The altexe folder has ARM and explicit x64 builds if the default one won't run.
Download ventoy-x.x.xx-linux.tar.gz and extract it:
tar -xzf ventoy-*-linux.tar.gz
cd ventoy-*/Verify the download against the SHA-256 published on the release page:
sha256sum ventoy-*-linux.tar.gzYou get three ways to run it: Ventoy2Disk.sh (CLI), VentoyGUI.x86_64 (desktop GUI), and VentoyWeb.sh (browser UI on http://127.0.0.1:24680). The CLI is the one worth knowing.
source: ventoy.net — getting started
Step 2 — Install Ventoy to the USB
Run Ventoy2Disk.exe and accept the UAC prompt — it needs admin to write partitions.
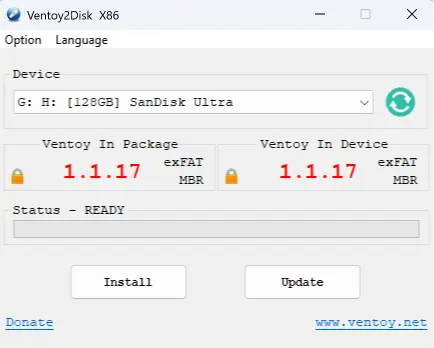
- Device — pick your USB drive. The dropdown shows the drive letter, size and model (
G: H: [128GB] SanDisk Ultraabove). If it's empty, hit the green refresh circle. Check the size matches the stick you plugged in. - Ventoy In Package is the version bundled with the installer; Ventoy In Device is what's already on the drive, or blank on a fresh stick.
- Optional — Option → Partition Style.
MBRis the default and boots on basically everything. Only chooseGPTif your target machines are strictly modern UEFI, or the drive is over 2 TB. - Optional — Option → Secure Boot Support. Turn this on now if you don't want to disable Secure Boot in BIOS later. See Secure Boot below.
- Click Install, confirm the two warnings, and wait. It takes seconds.
When it finishes, Windows may show two drives, or pop up "You need to format the disk" for one of them. That's normal and you should cancel. Ventoy makes a large exFAT data partition (the one you use) plus a ~32 MB VTOYEFI partition holding the bootloader. Never format VTOYEFI.
Find the device first. Get this wrong and you wipe the wrong disk:
lsblk -o NAME,SIZE,MODEL,TRANLook for the entry with TRAN=usb and the size that matches your stick. You want the whole device (/dev/sdb), not a partition (/dev/sdb1).
Then install:
sudo sh Ventoy2Disk.sh -i /dev/sdb| Flag | What it does |
|---|---|
-i | Install — refuses if Ventoy is already on the drive |
-I | Force install — wipes and reinstalls even if Ventoy is there |
-u | Update Ventoy in place, leaving your ISOs alone |
-g | Use GPT instead of the default MBR |
-s | Enable Secure Boot support |
Unmount any auto-mounted partitions of that device first, or the script will refuse to run.
When it's done you'll have two partitions: /dev/sdb1, a large exFAT partition for your ISOs, and /dev/sdb2, a ~32 MB VTOYEFI partition holding the bootloader. Leave the second one alone.
Most desktop distros mount exFAT out of the box. If /dev/sdb1 won't mount, install exfatprogs (or exfat-utils on older releases).
source: ventoy.net — getting started
Step 3 — Copy your ISOs on
This is the whole point of Ventoy — there's no flashing step. Open the big exFAT partition and copy ISO files onto it like any other folder.
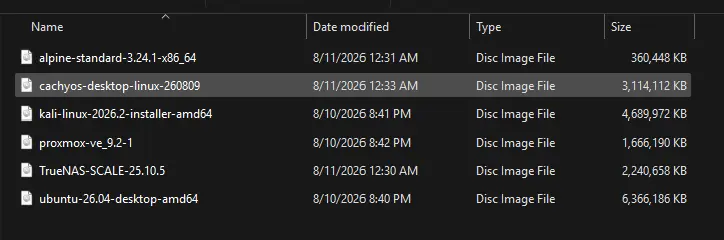
A few things worth knowing:
- Subfolders are fine. Ventoy searches the partition recursively, so
linux/,windows/,nas/all work. The menu mirrors your folder structure. - Filenames become menu entries, so keep them readable.
ubuntu-26.04-desktop-amd64.isoreads better in the boot menu thanubuntu.iso. - No 4 GB limit. The partition is exFAT, so Windows ISOs and other oversized images copy without the FAT32 file-size problem.
- It's a normal drive. You can also keep documents, drivers, or a portable app folder on the same partition. Ventoy ignores anything that isn't a bootable image.
- Beyond ISOs, Ventoy also boots
.wim,.img,.vhd,.vhdxand.efifiles.
Eject the drive properly before pulling it out — exFAT does not love being yanked mid-write.
Step 4 — Boot from the drive
Plug the stick into the target machine and open its one-time boot menu as it powers on. The key depends on the vendor:
| Vendor | Boot menu key | BIOS/UEFI setup |
|---|---|---|
| Dell, Lenovo, Acer, Toshiba | F12 | F2 |
| HP | F9 | F10 or Esc |
| ASUS | F8 or Esc | Del or F2 |
| MSI, ASRock, Gigabyte | F11 | Del |
| Most self-built desktops | F11 or F8 | Del |
Pick the USB entry — usually the drive model name, sometimes prefixed UEFI:. Ventoy's menu appears listing your ISOs. Arrow to one, hit Enter, and it boots as if you'd flashed that ISO directly.
At the Ventoy menu: F1 opens memdisk mode (helps with stubborn images), F2 shuts down, F3 switches the boot mode, F5 opens the debug/tools menu, and F6 toggles the grub2 mode. F1 is the one to try first when an ISO refuses to boot normally.
Secure Boot
On most machines shipped in the last decade, UEFI Secure Boot is on by default and will block Ventoy unless you handle it. Two options:
Option A — turn Secure Boot off. Go into BIOS/UEFI setup, disable Secure Boot, save and reboot. Simplest, and fine for a machine you're about to reinstall anyway. Turn it back on afterwards if you care.
Option B — enroll Ventoy's key. Enable Option → Secure Boot Support in Ventoy2Disk (or -s on Linux) before installing. The first time you boot that stick on a given machine you'll get a blue MokManager screen — enroll the key there, and that machine trusts Ventoy from then on. It's a one-time step per computer.
Two things bite people here. Some firmware also needs "Allow Microsoft 3rd Party UEFI CA" enabled in setup. And Ventoy 1.1.13 and newer requires enrolling a new key because of the UEFI CA 2023 rollover — if you set this stick up on an older Ventoy, re-enroll after updating. If you land on an error screen instead of the blue MokManager one, your firmware isn't compatible with the shim — fall back to Option A.
Also worth knowing: Ventoy's default policy does not enforce Secure Boot checks on the ISOs it chain-loads, so an unsigned image still boots once Ventoy itself is trusted.
source: ventoy.net — Secure Boot
Updating Ventoy later
New Ventoy releases fix boot compatibility with specific distros, so it's worth updating occasionally. Update is not the same as Install — it rewrites only the bootloader and leaves partition 1 completely untouched, ISOs and all.
Download the newer release, run the new Ventoy2Disk.exe, pick the drive, and click Update — the button on the right, not Install. Ventoy In Package will be higher than Ventoy In Device when there's something to apply.
sudo sh Ventoy2Disk.sh -u /dev/sdb-u updates in place. Do not use -i or -I on a drive you want to keep — those wipe it.
Troubleshooting
| Symptom | Fix |
|---|---|
| Drive doesn't appear in the boot menu | Disable Secure Boot or enroll the key. Also disable Fast Boot / Ultra Fast Boot, and enable USB boot / legacy USB support if present. |
| "You need to format this disk" popup | That's the 32 MB VTOYEFI partition. Cancel. Never format it. |
| Ventoy menu appears but the ISO won't boot | Press F1 at the menu for memdisk mode, or F3 to switch boot mode. Update Ventoy — new releases add compatibility fixes. |
| Device dropdown is empty in Ventoy2Disk | Hit the green refresh icon. Ventoy hides drives over 1 TB by default — enable Option → Show All Devices if yours is that big. |
| Booted into a distro but it can't find its ISO | Some images need extra boot params. Check Ventoy's tested-ISO list for notes on that specific distro. |
| Copying a big ISO fails partway | Cheap flash drives fake their capacity. Test the stick's real size before trusting it. |
Quick reference
# Linux — identify the USB device (want the whole disk, not a partition)
lsblk -o NAME,SIZE,MODEL,TRAN
# Linux — install (WIPES the drive)
sudo sh Ventoy2Disk.sh -i /dev/sdb # install
sudo sh Ventoy2Disk.sh -I /dev/sdb # force install over an existing Ventoy
sudo sh Ventoy2Disk.sh -i -s /dev/sdb # install with Secure Boot support
sudo sh Ventoy2Disk.sh -i -g /dev/sdb # install using GPT instead of MBR
# Linux — update the bootloader, keep the ISOs
sudo sh Ventoy2Disk.sh -u /dev/sdb
# Windows — extract the zip, then run as admin:
# Ventoy2Disk.exe -> pick device -> Install (wipes) / Update (keeps)
# After install: partition 1 = exFAT, copy ISOs here (subfolders fine)
# partition 2 = VTOYEFI, ~32 MB, leave it alone
# At the Ventoy boot menu
# F1 memdisk mode F2 shutdown F3 boot mode F5 tools F6 grub2 modeNext: what to put on it
A Ventoy stick is the fastest way to try homelab OSes without committing a drive to any of them. Load it up with the installers for what you actually want to run:
- Proxmox VE — hypervisor, so one box can run everything else as VMs
- TrueNAS SCALE — storage first, apps second
- Ubuntu Server / Debian — the plain base most guides here assume
- A Windows ISO, because you will eventually need one
Once the box is up, pick a service to put on it: